Copied From Border
Barrels
FITTING A .22 RIMFIRE BARREL
THE BORDER BARRELS WAY
We at Border Barrels have fitted hundreds (maybe thousands) of .22 rimfire
barrels over the past ten years. As the result, we have refined and developed
our method of fitting barrels to give the best results possible. Below is an
easy step-by-step approach to fitting a drop-in Border barrel to your rifle. The
pictures show us fitting a barrel to an 14 series Anschutz rifle, but we make
barrels for the 18, 19 and 20 series rifles too, and we now make drop in barrels
for Walther rifles and Feinwerkbau rifles.
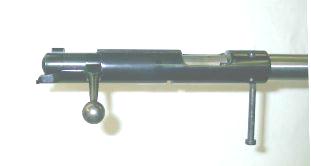
STEP ONE: Remove the pins
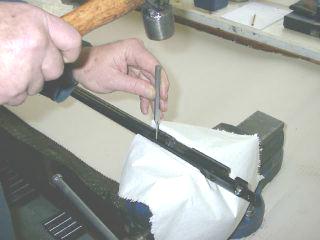 After taking the bolt out and removing the trigger, the first thing to do is to
remove the two side pins which help retain the barrel in the action. Hold the
action in a vice with soft or protected jaws, and using a large (2lb) hammer and
a suitable punch, knock out the pins. Note that the pins are knocked out from
the top of the action.
After taking the bolt out and removing the trigger, the first thing to do is to
remove the two side pins which help retain the barrel in the action. Hold the
action in a vice with soft or protected jaws, and using a large (2lb) hammer and
a suitable punch, knock out the pins. Note that the pins are knocked out from
the top of the action.
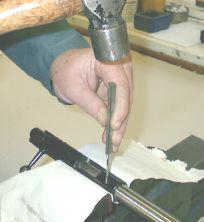
STEP TWO: Knocking out the barrel
 Now that the pins are out, put a mandrel up the action which is machined to be a
nice sliding fit. Holding the action in a gloved hand, take the 2 lb hammer and
knock the barrel out. It takes some effort to do this! (Good idea to wear
hearing protection while doing this.) This is best done outside, or at least
pointing the barrel where it will do no harm as it comes flying out of the
action!
Now that the pins are out, put a mandrel up the action which is machined to be a
nice sliding fit. Holding the action in a gloved hand, take the 2 lb hammer and
knock the barrel out. It takes some effort to do this! (Good idea to wear
hearing protection while doing this.) This is best done outside, or at least
pointing the barrel where it will do no harm as it comes flying out of the
action!
STEP THREE: Removing extractors and firing pin assembly
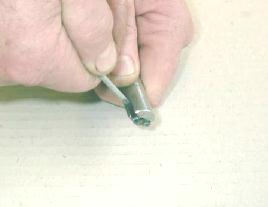 The next step is to remove the firing pin assembly by unscrewing the cap at the
back end of the bolt and withdrawing the firing pin assembly complete. The
extractors are then removed using a small electricians screwdriver or, better, a
special little tool made up to do the job. Just push the tool in behind the back
of the extractor, between the extractor and the front of the spring loaded
plunger, and lever the thing out.
The next step is to remove the firing pin assembly by unscrewing the cap at the
back end of the bolt and withdrawing the firing pin assembly complete. The
extractors are then removed using a small electricians screwdriver or, better, a
special little tool made up to do the job. Just push the tool in behind the back
of the extractor, between the extractor and the front of the spring loaded
plunger, and lever the thing out.
The extractor is held in place with a spring loaded plunger, so make sure the
bolt is pointing into a suitable container or the spring and plunger will
disappear, never to be found!
The bolt handle and the cap at the back of the bolt which holds it in place
should then be replaced.
STEP FOUR: Gluing in the barrel.
 Gluing in a .22 rimfire barrel is a very satisfactory way of attaching the
barrel to the action. Using type 601 Loctite, it will take about 5.5 tons of
force to push the barrel out again - which is many times the force it
experiences during cartridge ignition! Too, there are no real problems in
aligning the extractor slots - a problem when screwing the barrel in, and there
is no resulting stresses in the action or barrel as there are when screwing or
clamping the barrel in place.
Gluing in a .22 rimfire barrel is a very satisfactory way of attaching the
barrel to the action. Using type 601 Loctite, it will take about 5.5 tons of
force to push the barrel out again - which is many times the force it
experiences during cartridge ignition! Too, there are no real problems in
aligning the extractor slots - a problem when screwing the barrel in, and there
is no resulting stresses in the action or barrel as there are when screwing or
clamping the barrel in place.
The inside of the front of the action where the barrel goes should be cleaned
out to ensure there are no powder residues or grease and then rubbed with some
emery paper to give a good keying surface for the Loctite.
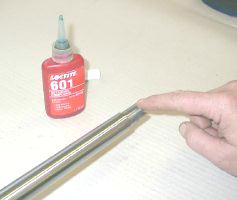
A thin film of type 601 Loctite is then smeared around the inside of the action
AND around the back end of the barrel which will go into the action. Only use a
thin film of glue. Do not let the glue run into the extractor slots.
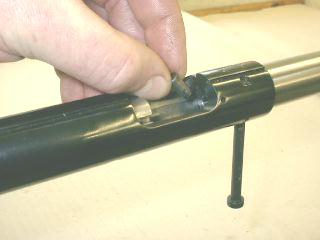
 It is a good idea to draw a line on the bottom of the acton from the centre of
the front bedding screw hole to the front of the action. This will help aligning
the barrel to the witness mark on the bottom of the barrel so that the extractor
slots are in the right place and the sight mounts are on the top! (19 series
Anschutz actions have a slot cut into the action at this point. Just align the
witness mark to the centre of this slot.) Then gently slide the barrel right
into the action as far as it will go, using a rotary motion to ensure the
Loctite is evenly spread over the join. Finish with the witness mark lined up
with the mark you have made on the action, as shown in the picture to the right.
It is a good idea to draw a line on the bottom of the acton from the centre of
the front bedding screw hole to the front of the action. This will help aligning
the barrel to the witness mark on the bottom of the barrel so that the extractor
slots are in the right place and the sight mounts are on the top! (19 series
Anschutz actions have a slot cut into the action at this point. Just align the
witness mark to the centre of this slot.) Then gently slide the barrel right
into the action as far as it will go, using a rotary motion to ensure the
Loctite is evenly spread over the join. Finish with the witness mark lined up
with the mark you have made on the action, as shown in the picture to the right.
The front bedding screw should now be screwed in so that it lightly bottoms out
on the barrel and holds the barrel in place.
STEP FIVE: Adjusting the headspace
 Grip the barrel in a vice with protected jaws. Now insert a headspace gauge into
the chamber. A .042" gauge is the recommended size for most consistant results.
Grip the barrel in a vice with protected jaws. Now insert a headspace gauge into
the chamber. A .042" gauge is the recommended size for most consistant results.
Then close the bolt onto the gauge. If the front bedding screw is done up too
tight, you will not be able to close the bolt. If the front bedding bolt is not
done up too tight, then you should be able to close the bolt and you will see
the barrel move forward out of the action by a few thou'. This is as it should
be.
The idea is to do the front bedding bolt up so that the barrel can move forward
while closing the bolt and so that you DO NOT HAVE TO USE A LOT OF FORCE to
close the bolt!
 You
may like to practice with some dry runs without the glue before doing a "wet
run", so that you get a feel for how much you should tighten the front bedding
bolt.
You
may like to practice with some dry runs without the glue before doing a "wet
run", so that you get a feel for how much you should tighten the front bedding
bolt.
After the head space has been adjusted by closing the bolt onto the headspace
gauge, remove the bolt and the headspace gauge. Then allow the glue to set for
at least an hour - preferably overnight.
STEP SIX: Putting the side pins back in.
 After the glue has set, the side pins can be replaced in the action by gently
tapping them in from the top as shown. There are clearance slots cut into the
barrel which mean that the pins now play no part in retaining the barrel in the
action. Replacing the pins is just a cosmetic operation - the finished job looks
better with them in than out!
After the glue has set, the side pins can be replaced in the action by gently
tapping them in from the top as shown. There are clearance slots cut into the
barrel which mean that the pins now play no part in retaining the barrel in the
action. Replacing the pins is just a cosmetic operation - the finished job looks
better with them in than out!
The extractor claws can now be replaced. The two extractors are different! Make
sure you put them into the correct slots.
With 14 and 18 series Anschutz rifles, you will have to transfer the forsight
block from the old barrel to the new. The forsight block on the original
Anschutz barrel is held in with Loctite, so make sure your use a well fitting
screwdriver to remove the screws, and push down hard while starting to unscrew
the screws so that the screwdriver does not slip.
Replace the firing pin assembly in the bolt and you are ready to go out
shooting!
STUFF YOU NEED TO FIT A DROP IN BORDER BARREL
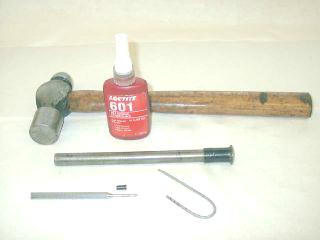 You will need an bottle of type 601 Loctite glue, a 2 lb hammer, a small punch
for pushing out the side pins, a mandrel for pushing out the barrel, a .042"
headspace gauge and a tool for getting the extractor claws out. (A small
electricians screwdriver will do the job here.)
You will need an bottle of type 601 Loctite glue, a 2 lb hammer, a small punch
for pushing out the side pins, a mandrel for pushing out the barrel, a .042"
headspace gauge and a tool for getting the extractor claws out. (A small
electricians screwdriver will do the job here.)