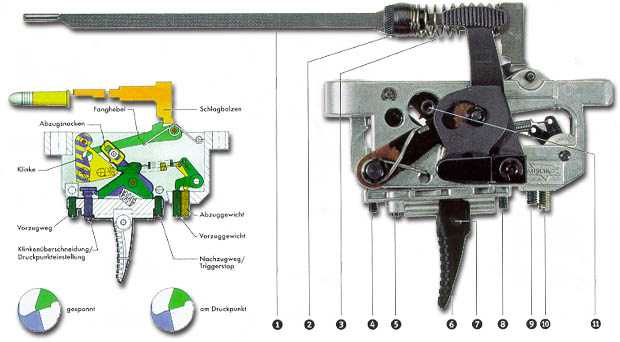
How to set Anschütz Match Triggers
(also see adjustment screws diagram)
Please note:
Your ANSCHÜTZ target rifle offers you a wide range of individual
adjustments. Whenever you work on your rifle settings, please make
absolutely sure that your rifle has been properly
unloaded.
1. Trigger weight
1.1 Adjusting the trigger weight with setting screw No. 10 (silver screw)::
right turn to increase trigger weight(+)
left turn to decrease trigger weight(-)
Both, trigger weight and first stage weight, are mutually dependend
mechanically. So, if one of them is changed there will always be a small, but
noticeable corresponding change in the other.
1.2 Moving trigger cam No. 11:
lowest position of trigger cam: lowest trigger weight
highest position of trigger cam: highest trigger weight
If the trigger weight is to be more than 200 g, the trigger cam
No. 11 must
be adjusted to the highest position (turn by 180° and secure), using a 2 mm
hex key and possibly tweezers:
turn left to loosen the screw
turn righ to tighten the screw
After adjusting the cam, please check the sear engagement according to
paragraph No. 3. It might have to be adjusted as well. The precise adjustments
of the trigger weight and first stage weight are carried out with the setting
screws No. 10 (trigger weight) and No. 9 (first stage weight).
Caution:
Please ensure that the position of the trigger cam is correct. Too much
pressure on the torque may wreck the hex screw!
2. First stage weight (two-stage triggers only)
Adjust first stage weight with setting screw No. 9 (black screw):
turn right to increase first stage weight (+)
turn left to decrease first stage weight (-)
Both, trigger weight and first stage weight, are mutually dependend
mechanically. So, if one of them is changed there will always be a small, but
noticeable corresponding change in the other.
3. Sear engagement
The sear engagement is the distance between the second stage and the
release of the trigger.
Important note:
To protect the precision trigger and to guarantee its perfect functioning
you should always close the action very carefully. If the sear engagement of
single stage triggers is too small and the trigger weight is too low or if the
first stage of two-stage triggers is to short, any sudden impact or harsh
closing of the action might release the trigger and thereby
inadvertently loosening a shot if the gun is
loaded and not in the "safe" position.
3.1 Adjusting the sear engagement for two-stage triggers with
setting screw No. 5:
turn right to shorten sear engagement
turn left to extend sear engagement
3.2 Finding the optimum sear engagement:
Make sure your rifle is not loaded. Cock your
rifle and release the trigger. Check if the trigger releases as desired.
3.2.1 The sear engagement is too long:
There is a small distance between the second stage and the release of the
trigger.
After cocking and releasing turn the setting screw No. 5 stepwise to the
right (approximately 1/8 of a turn each time).
Repeat until second stage resistance is zero. Then go back 1/5 turn to the
left, thus reaching the optimum sear engagement.
3.2.2 The sear engagement is too short:
There is no noticeable second stage resisance. The trigger releases
unpredictably.
After cocking and releasing turn setting screw No. 5 counter-clockwise
(approximately 1/8 of a turn).
Repeat until the desired adjustment is reached.
3.3 Adjusting the sear engagement for single stage triggers with
setting screw No. 5:
Turn first stage weight screw No. 4 to the left until you have reached the
maximum first stage.
Cock the rifle.
Turn setting screw No. 5 (first stage) to the left until the trigger
releases.
From this position turn screw No. 5 approx. ¼ turn to the right.
The trigger is now adjusted to single stage operation, there is no more
first stage.
Caution:
Single stage triggers are extremely sensitive
and must be handled with utmost care.
A sear engagement of 5/100 mm is obtained immediately
after closing the action. In combination with a minimum trigger weight there
might be a malfunction and an increased risk
(independent shot release).
4. First stage (single stage triggers only)
The "first stage" is the distance of the trigger blade moving from zero
position up to the second stage.
Adjusting the first stage with setting screw No. 4:
turn right to shorten the first stage
turn left to lengthen the first stage
Caution:
There is no safegueard against turning the screw No. 4 (first stage) beyond
the second stage function, thereby disabling the trigger.
Grave risk! Under no circumstance may the
first stage be reduced to naught, which in effect would convert a two-stage
into a single stage trigger.
5. Trigger-Stop
The distance from the second stage to where the trigger blade comes to a
halt, is called the "trigger stop".
Adjusting the trigger stop with setting screw No. 8:
turn right to shorten
turn left to lengthen
Caution:
Again there is no safeguard against turning the trigger stop screw No. 8
past the second and even the first stage function, in which case a malfunction
results: the trigger does not release!
6. Adjusting the trigger blade
Loosen hex screw No. 7, and the trigger blade
No. 6 can be moved in the
longitudinal guide as well as tilted laterally.
7. Changing atwo-stage trigger into a single stage
trigger
Release the safety catch and cock the rifle.
Turn setting screw No. 4 approx. 3 turns to the left so that it does not
touch the trigger housing anymore. Turn screw No. 5 (second stage) slowly to
the left until the releasing point is reached, then give it as much as a ¾
turn to the right.
Possibly, as a consequence, the trigger stop has to be shortened (see
paragraph No. 5) and the trigger weight needs adjusting.
8. Changing a single stage trigger into a two-stage
trigger.
Turn trigger stop set screw No. 8 approx. 2 ½ turns to the left.
Release safety and cock rifle.
Gently squeeze the trigger to check whether there is a second stage before
the trigger releases.
If there is no second stage:
Cock again and turn screw No. 5 approx. 2 ½ turns to the right.
You should now feel the second stage.
In order to obtain the optimal sear engagement proceed according to
paragraph 3.
If there is a second stage:
Proceed according to paragraph 3 (sear engagement is too long).
You may have to adjust the first stage (see paragraph 4), the trigger stop
(see paragraph 5), the trigger weight (see paragraph 1) and the first stage
weight (see paragraph 2) to the desired values.
9. Malfunctions of the trigger due to faulty adjustment.
If the trigger is not adjusted correctly malfunctions may occur. In such
cases it is highly unlikely that uncontrolled tampering with the trigger
adjustments will achieve aceptable results.
It is therefore recommended to proceed as follows: Check the function of the
trigger after each adjustment step. When the malfunction is removed check the
all trigger settings and adjust them again if necessary.
9.1 The trigger catches the cocking piston or firing pin, but the trigger
does not release:
Make sure that the safety catch is off.
Check if the trigger cam is mounted correctly.
Most likely the trigger stop screw No. 8 is too tight. Give it a few turns
to the left until the cocking piston or firing pin releases again.
9.2 The trigger does not catch the cocking piston or firing pin:
The first stage setting screw No. 4 may be too tight.
Make sure that the spring is not defective and has been attached
correctly.
Give screw No. 5 (second stage) a few turns to the right.
10. Safety catch
On the left side of the trigger there is a safety catch. Please see chapter
"Cocking, Loading and Securing your rifle".
11. Maintenance
Lubricate the bearings lightly with cold resistant molybdenum disulphide
grease once a year.
Put a small amount of oil into the bearing parts using a needle.
To avoid build-up of resins or other residues on trigger parts, do not use
cleaning sprays or oils.
Attention:
While cleaning the rifle exercise great care in order to avoid dirt,
residues of solvents, grease or non-suitable oils from getting into the
trigger mechanism. We recommend to either use our cleaning rod guide model No.
4403 (Order No. 710.6320) or to put the gun on its side, better even with the
shaft pointing upwards, so that valve unit and trigger mechanism are safe from
being damaged.